Adding case studies to your Instagram is a simple and effective way to showcase your results on social media.
Potential clients will see them before visiting your clinic, helping to build trust and interest. Plus, it makes sharing case studies in person effortless—just open your phone and show clients your Instagram page.
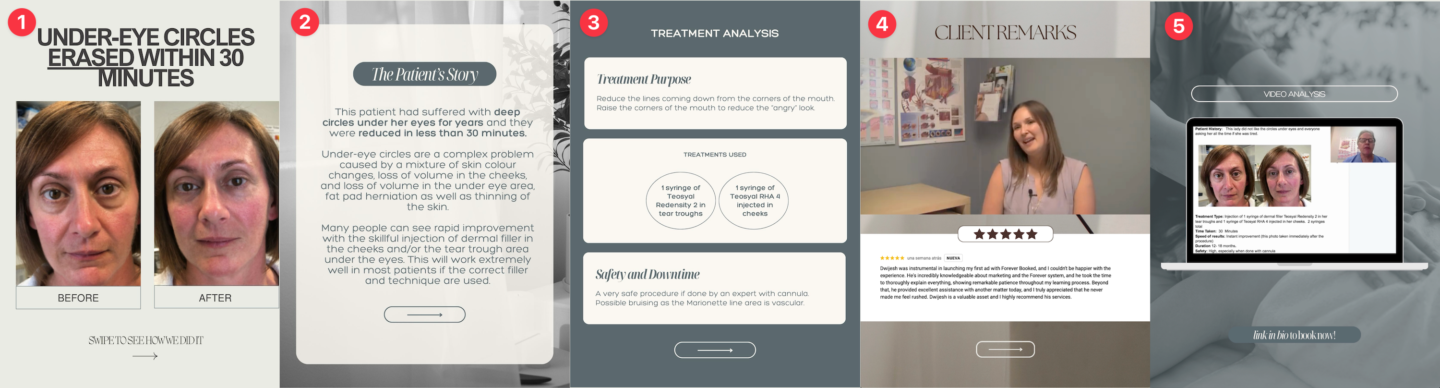
The best format for this is an Instagram carousel. See example below:
Carousel Post Elements
An effective carousel post contains the following elements:
- B&A photo with headline: Can add multiple slides for different angles.
- Patient story: Gives more content to the B&A photo.
- Analysis: Explains the actual treatments given and how you were able to achieve the transformation.
- Client Remarks: Contains a screenshot of Google review and/or client interview/testimonial.
- Video Analysis: Optional video analysis which can be created with a screen share software like Loom.
How To Create Carousel Posts
Step 1: Duplicate & Edit Canva Template
The easiest way to create your posts is to use our provided templates.
Click on the links below to access our Canva templates.
NOTE: These are templates and can’t be edited directly. Follow our quick Canva training for instructions on how to make copies of the templates and edit them.
Carousel Template 1
Carousel Template 2
Step 2: Download Edited Files
Make sure you download images and video slides as separate files.
Step 3: Post To Instagram
Post to Instagram using the carousel post option.
For the caption, you can edit the template below:
Instagram Caption Template:
✨ [Case Study Headline] ✨
[Insert client story here]
🎯 Purpose:
💉 Treatments:
⏳ Time:
⚡ Results:
✔️ Safety:
✨ Ready for a subtle, confidence-boosting refresh? DM us to book your consultation! 💌
Transcript
0:00 Alright, so in this video we're going to show you how to post your case studies to Instagram. So Instagram it's a great platform to post your case studies on it's heavily used in the aesthetic initiatives I'm sure you know.
0:12 And when you post your case studies to Instagram, people are going to see them before they come into your clinic so it acts as a great marketing tool.
0:19 But then you can also just show people in clinic you can bring up your phone and show them your Instagram with your case studies in the clinic as well.
0:25 So I recommend the carousel format because you can show multiple pages or multiple slides showing different aspects and sort of breaking up the case study, and here's how to do that.
0:37 So an effective case study is on Instagram. It's going to contain the same elements as in your proof page before and after photo with the headline, the patient story, an analysis right here.
0:46 The client remarks in a video analysis. You don't have to have the videos in here, but if you have them, it's kind of cool to put them in the slides so people can go through them and watch the testimonial video.
0:56 if you have them and also a video analysis as well. So we made it really easy for you and provided you with case study templates, a carousel templates in Canva.
1:05 At the time of this video, there's only one but we'll be adding more shortly. So by the time you watch it, there should be more.
1:11 All you need to do is click on this link here, open up Canva. Remember this is a template, so you can't edit it directly.
1:17 Just like how you would edit your ads, you're gonna go to file and then make a copy to make a copy of the template and then you can start editing it.
1:25 So the way we structure this is for each slide there's three options and the reason we do this is because depending on how your before and after photos look they may be more in landscape or more portrait mode you can, you can decide which one will work best for you.
1:42 So in this case the photos I have are more portrait so I'm going to just delete this one and then also delete the one below it.
1:51 And then I'm going to add my photos to this. So I already have them uploaded here in Canva. I'm just going to go to uploads, and then I'm just going to drag the before photo there, and then I'm going to drag the after photo as well.
2:02 So I'm going to drag, oh, that's the before photo as well. I'm going to drag the after photo here. So now we have our first page with the headline, and then the before and after.
2:12 And then the second one is the patient's story. So you can just copy and paste the patient's story here. This is just a template story, but you can copy the same one in that you created back when you added your case study to the proof page, that's when you type up the story.
2:25 So again, there's three options here. There's some options with photos. So if you have more photos of the treatments being performed, you want to add some other photos in, you can add them here or on this one, but I'm going to delete these two options since I'm not using them.
2:38 Just delete them. The third page is the treatment analysis that has the purpose, the treatments used, and the safety and downtime.
2:44 So you can just use the same information from your proof page, the case studies there, and then I'm going to delete these two options because I want to use the top one.
2:54 And now we have the client remarks. So in this slide, you can have either just a screenshot of the Google review, or what you can also do if you have a video testimonial of that client, you can drag them in here.
3:06 So to do that, I already have the video uploaded here. We're just going to drag the video into here. Now, as a video and added to Instagram and then again, there's two other options here.
3:21 We're not going to use these ones, so we're going to delete them. And then finally, the video analysis. So if you have the video analysis, which I talked about in previous training, you can just drag it in here.
3:30 And now we also have the video analysis as well. And then same thing here, we can delete these two options right here.
3:38 And at this point, you have the completed case study the next step is to download it so you're going to go to share and then you're going to go to download and we want to download images and videos because the image slides are going to be images but the videos are going to be full videos so we're going
3:54 to go to JPEG just leave the settings as is and we're going to select only the pages that have the images that are still images so it's going to be the first three we're going to download those go to done hit download it's going to download to your computer.
4:12 And now we also want to download the videos. So now we're going to go to download, we'll just save it to my desktop.
4:17 download the videos. Just go to share, and then download, go to MP4 Video, and then select the pages, which will be the two video pages, these last one.
4:28 And now you're going to select download pages as separate files. This is super important, and now we're hit download. So now the downloads are complete.
4:37 You're going to go to your desktop. We have the photos right here. So open up the zip files. So now you have your photos, which you can upload to Instagram.
4:45 And then you also have your videos. So you're going to go over to Instagram. You're going to create a carousel post.
4:50 Upload the photos and then the videos. And now you'll have a carousel post for Instagram. When you post, we also have this Instagram caption template.
4:59 So you can use this template for the caption post to Instagram and that's how you post your case studies to Instagram as a carousel.